Facebook – you failed me again… and again… and…
Facebook, how do expect anyone to develop anything for you if:
- your code samples provided don’t work
- your documentation page is broken and not accessible for over 6 hrs already
- there is no way of contacting anyone about issues above
And to prove all above:

And PHP SDK error page: https://github.com/facebook/facebook-php-business-sdk/issues/464
Full day wasted. Thanks a lot!
In: English, Fighting the system
Little PHP script to create MySQL table from CSV/TSV/Excel file with or without data
Recently I needed a little tool to create many DB tables in MySQL from Excel/CSV docs and as an outcome of that I’ve created this little tool:
https://github.com/aarefjev/csv_to_mysql
It’s a little buggy I suppose, but does what it’s supposed to.
Have fun!
In: English, Fun, mySQL · Tagged with: csv, php
Password Protect Directory with NGinx
& Ubuntu 16.04
sudo apt-get install apache2-utils
htpasswd -c /home/username/.htpasswd username

Login: username
Password: your_cool_password

those lines are added to "/etc/nginx/sites-available/cool_site_config config

location /restricted_area {
        auth_basic "Administrator Login";
       auth_basic_user_file /home/username/.htpasswd;
}
In: English, Linux, nginx, Ubuntu
How to find out your WiFi password details on Windows 8 & Windows 10
Two simple commands in the command line interface will help you:
- first to list all saved connections
- second to get information about that connection
in my sample:
netsh wlan show profile key=clear
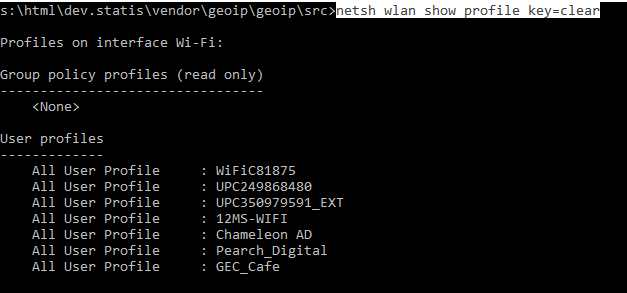
After we have profile names – we can pinpoint to one:
netsh wlan show profile name="GEC_Cafe" key=clear
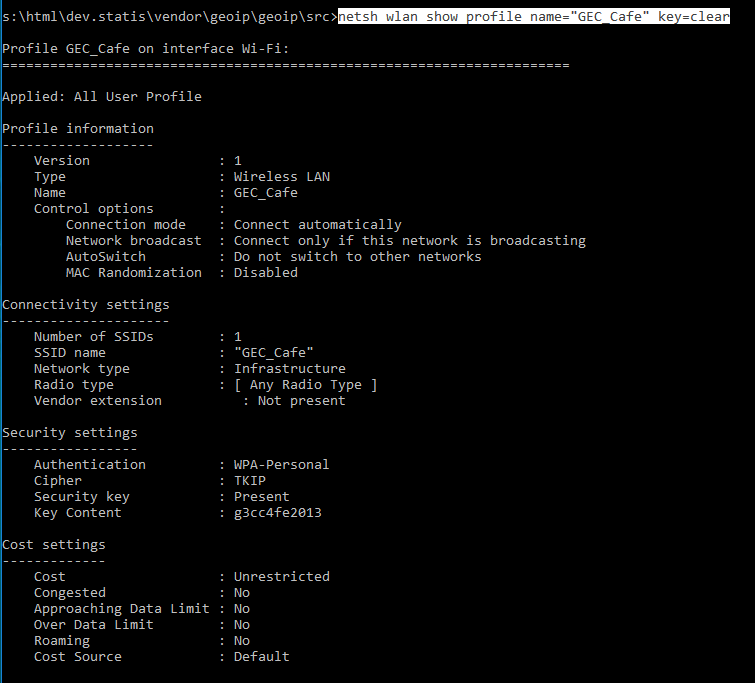
Key Content value is exactly what we were looking for.
New Ubuntu 16.04 install with Apache2 & Multiple PHP versions on the same machine
Don’t have much time time – so a very quick guide:
sudo apt install openssh-server
sudo apt-get install -y mc openssh-client git wget apache2 build-essential php php-json
apt install software-properties-common
sudo add-apt-repository ppa:ondrej/php
sudo apt-get update

sudo apt-get install php5.6-fpm
a2enmod proxy_fcgi setenvif
a2enconf php7.0-fpm # if you want to make 5.6 main version: > a2enconf php5.6-fpm

# Edit /etc/apache2/apache2.conf
# AllowOverride All > change to All
<Directory /var/www/>
 Options Indexes FollowSymLinks
 AllowOverride All
 Require all granted
</Directory>


service apache2 restart
PS: php7 will be enabled by default, in order to enable 5.6 on the same server add content from the php5.6-fpm.conf to .htaccess (not all content from there is needed, but… what the heck).
PPS:
Co-installable PHP versions: PHP 5.6, PHP 7.0 and batteries included.
You can get more information about the packages at https://deb.sury.org
For PHP 5.6 use: ppa:ondrej/php5-5.6
For PHP 5.5 use: ppa:ondrej/php5
For PHP 5.4 use: ppa:ondrej/php5-oldstable
More info on a new fast cgi proxy interface in Apache:
https://wiki.apache.org/httpd/PHP-FPM
If MbString extention doesn’t work in php5.6:
> apt install php5.6 libapache2-mod-php5.6 php5.6-curl php5.6-gd php5.6-mbstring php5.6-mcrypt php5.6-mysql php5.6-xml php5.6-xmlrpc
Craft CMS & Twig Snippets
Some samples dumped here
Related Entries (aka “entries” type field)
{% set authors = craft.entries.section('newsAuthors').relatedTo(entry) %}
{% set auth = authors.first() %}
Current Page URL
{{ url(craft.request.path) }}
How to get NEO/ Matrix Field in template
{{entry.textWithSubtitle.first().subtitle}}
Loop entire section
{% for key,job in craft.entries.section('jobs') %}
    OUT
{% endfor %}
Neo/Matrix fields with block types
	{%for key2,block in job.textWithSubtitle%}
	    {% if block.type == "textwithsubtitle" %}
	        {{ block.subtitle }}
	        {{ block.body }}
	    {% elseif block.type == "text" %}
	        {{ block.text|markdown }}
	    {% endif %}

	{% endfor %}
Useful string filters
{{block.body|striptags }} - strip html tags
{{block.body|striptags|e }} or {{block.body|striptags|escape }} - escape special chars aka &->&
Get URL segments
{{craft.request.getSegment(1)}}
In: Craft CMS + Twig, English, Fighting the system
RapidSSL cert installation on nginx server
I recently installed RapidSSL cert and got “not trusted” message on Android (desktop browsers were both ok)
Now… this is how to install RadidSSL cert properly.
Step 1: got and check your installation here https://cryptoreport.rapidssl.com/checker/views/certCheck.jsp – if you’ve got nothing working yet – just download RapidSSL SHA256 CA cert from here:
Or choose the one you like the most (only kidding – the one that you actually need SHA256) from -> https://knowledge.rapidssl.com/support/ssl-certificate-support/index?page=content&id=AR1549
Save this cert as intermediate.crt
Step 2:
Save your cert you received via email as SSL.crt
Step 3:
- You need to combine the SSL.crt file and the intermediate.crt into a single concatenated file
- To get a single concatenated file out of the Intermediate CA and the SSL Certificate run the following command:cat intermediate.crt >> SSL.crt
Step 4:
This is a part of my nginx config file:
server {
    listen 80 default_server;
    listen 443 ssl;
    server_name default;
    root /home/forge/default/public;

    # FORGE SSL (DO NOT REMOVE!)
    # ssl_certificate;
    # ssl_certificate_key;

    ssl_certificate     /etc/nginx/ssl/SSL.crt;
    ssl_certificate_key /etc/nginx/ssl/www.domainname.com.key;
ssl_certificate should be your concatenated file created in Step 3
ssl_certificate_key should be the key file generated when you created the CSR.
Step 4: restart your server. Enjoy!
PS: I’ve seen some comments about using slightly different format, but haven’t tested that myself:
SSLCertificateFile      /etc/httpd/ssl/domain.crt
SSLCertificateKeyFile   /etc/httpd/ssl/domain.key
SSLCertificateChainFile /etc/httpd/ssl/intermediate.crt
In: English, Linux, nginx, Ubuntu · Tagged with: nginx
Install Android SDK on Linux – in my case Ubuntu 14.04 server
wget http://dl.google.com/android/android-sdk_r24.4.1-linux.tgz
tar -xvf android-sdk_r24.4.1-linux.tgz
cd android-sdk-linux/tools
./android update sdk --no-ui
create file: ~/.zshrc with follwing content: export PATH=${PATH}:$HOME/sdk/android-sdk-linux/platform-tools:$HOME/sdk/android-sdk-linux/tools:$HOME/sdk/android-sdk-linux/build-tools/23.0.2/
sudo apt-get install libc6:i386 libstdc++6:i386
sudo apt-get install zlib1g:i386
Linux install Java 8 from Oracle
sudo add-apt-repository ppa:webupd8team/java
sudo apt-get update
sudo apt-get install oracle-java8-installer
sudo apt-get install oracle-java8-set-default
How to resize (make it bigger) partition on Ubuntu 14.04 in Command Line
Let’s assume you have new virtual Linux Server box running and you “suddenly” out of space. Shit.
Well, you stopped your VM and increased the size of you hard drive from 20Gb to 40Gb, started VM again and… nothing changed.
This is what I did:
Sttep1: First i run cfdisk and removed swap (yes, you have to do it) and wrote change to a disk.
Step 2: Run Fdisk
sudo fdisk /dev/sda
Command (m for help): p
Device Boot Start End Blocks Id System
/dev/sda1 * 2048 9437183 4717568 83 Linux
Command (m for help): d
Selected partition 1
Command (m for help): p
Device Boot Start End Blocks Id System
Command (m for help): n
Command action
e extended
p primary partition (1-4)
p
Partition number (1-4, default 1): 1
First sector (2048-10485759, default 2048):
Using default value 2048
Last sector, +sectors or +size{K,M,G} (2048-10485759, default 10485759):
Using default value 10485759
Command (m for help): p
Device Boot Start End Blocks Id System
/dev/sda1 2048 10485759 5241856 83 Linux
Command (m for help): w
The partition table has been altered!
Calling ioctl() to re-read partition table.
WARNING: Re-reading the partition table failed with error 16: Device or resource busy.
The kernel still uses the old table. The new table will be used at
the next reboot or after you run partprobe(8) or kpartx(8)
Syncing disks.
Great.
Step 3: Reboot and run this:
sudo resize2fs /dev/sda1
Step 4: Now we need to create swap – go on and add another 1 or 2 gb to you hard drive in VM settings (size depends on the size of your VM memory – I have 1Gb).
Step 5: reboot, create new partition using cfdisk (in our sample it’s going to be /dev/sda2) and now create new swap:
sudo mkswap /dev/sd2
find swap UUID: blkid /dev/sda2
/dev/sda2: UUID="d4b07f36-2c18-4880-b301-f4c3b4f48ee0" TYPE="swap"
and put swap online:
sudo swapon -U d4b07f36-2c18-4880-b301-f4c3b4f48ee0
And to make it permanent add UUID to /etc/fstab file
root@ubuntu-local:~# cat /etc/fstab
# /etc/fstab: static file system information.
#
# Use 'blkid' to print the universally unique identifier for a
# device; this may be used with UUID= as a more robust way to name devices
# that works even if disks are added and removed. See fstab(5).
#
#
# / was on /dev/sda1 during installation
UUID=a13088d1-b28d-4638-84f9-794780fe2a4b /               ext4    errors=remount-ro 0       1
# swap was on /dev/sda5 during installation
UUID=d4b07f36-2c18-4880-b301-f4c3b4f48ee0 none            swap    sw              0       0
Done.
Have fun!
In: English, Fighting the system, Linux